
macOS · Apple Silicon · Setup guide
Speak in one app.
Write in another.
Double-press the left Command key to start and stop recording. Let Viska paste the finished transcript into the text field you are using. Here is the complete first-time setup.
For the current macOS preview. Updated 31 August 2026. macOS labels may vary slightly by version.
These are separate permissions. A working recording shortcut does not mean automatic paste is allowed. Only grant access to a Viska copy you trust; Input Monitoring can observe keyboard input and Accessibility can control other apps. Full Disk Access and Screen Recording are not required for this setup.
Step 1
Install one copy in Applications.
- Download the macOS Apple Silicon preview from this site and open the DMG disk image. This download is not for Intel Macs.
- Drag Viska.app to the Applications shortcut, then eject the disk image. Launch
/Applications/Viska.app, not a copy inside Downloads, an external drive or a build folder. - The preview is not notarized. If macOS blocks it, review Apple’s instructions for opening an app from an unidentified developer. Only use the per-app approval if you trust the download; do not disable Gatekeeper globally.
- In Viska, open Menu → Models. Download and select a model for your language. Wait until the download finishes.
- Start a short recording and allow Microphone when macOS asks. If previously denied, open System Settings → Privacy & Security → Microphone and enable Viska.
No API key or cloud account is needed for local dictation. FFmpeg is not needed for live microphone dictation; it is used for audio-file import and OGG export.
Step 2 · Recording shortcut
Allow double-Command recording.
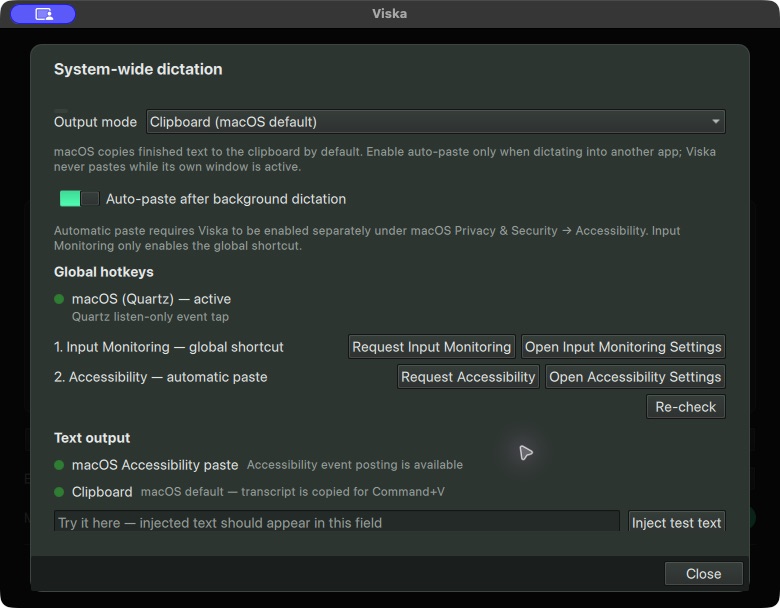
- In Viska, open Menu → Settings, scroll to Setup & statistics, then click System-wide dictation.
- Under the global-hotkey section, use Request Input Monitoring if needed, then Open Input Monitoring Settings. You can also navigate directly to System Settings → Privacy & Security → Input Monitoring.
- Enable Viska. If it is missing, click +, select Applications → Viska.app, click Open, and enable it. Authenticate yourself if macOS requests it.
- Quit Viska completely with Command + Q, then reopen it from Applications. If macOS offers Quit & Reopen, use that.
- Return to System-wide dictation and click Re-check. The macOS/Quartz hotkey backend should report active.
Double-press left Command is enabled by default. Press and release the left ⌘ key twice quickly, without another key held down. Repeat to stop. Do not hold Command, double-press Control, or use the right Command key.
The fallback shortcut is Command + Shift + D. On a PC keyboard, use the key macOS maps to the left Command modifier; the printed Windows/Alt label may not match your mapping.
Step 3 · Text delivery
Allow automatic paste separately.
- In Viska’s System-wide dictation, enable “Auto-paste after background dictation”. Choose Clipboard (macOS default) as the output mode, not Clipboard only or In-app only.
- Under Accessibility — automatic paste, click Open Accessibility Settings, or open System Settings → Privacy & Security → Accessibility. This is the privacy permission page, not the separate Accessibility category in the main sidebar.
- Enable Viska. If missing, use + to add
/Applications/Viska.app. Approve any macOS authentication prompt yourself. - Quit Viska completely and reopen it from Applications. Return to System-wide dictation → Re-check.
- Look for macOS Accessibility paste with a green indicator and the message “Accessibility event posting is available”.
Granting Input Monitoring alone is not enough. If the shortcut works but Accessibility paste is red, finish this step before testing automatic insertion.
Step 4
Test in a real text field.
- Keep Viska running, then switch to another app, such as a new TextEdit document. Click in an editable field so its text cursor is visible.
- Double-press the left Command key. Wait for recording to start and say a short sentence.
- Double-press left Command again to stop. Stay in the same app and field while Viska transcribes; do not click back into Viska.
- The finished text should appear once at your cursor. Repeat with a second sentence to confirm consecutive dictations work.
Background dictation should leave Viska’s editor unchanged, even if that editor already contains text. The finished transcript is also copied to the system clipboard. If a field rejects automatic paste or focus changes, try Command + V; Menu → Recent segments → Copy is another recovery option while the session remains open.
Do not use password fields for this test. Some secure fields or applications block synthetic paste. Viska does not press Return or send your message for you. Its built-in test inside the Viska window is not an end-to-end test of pasting into another app.
Keep it working
If permissions stop working after an update.
Replacing an unsigned preview can leave an old permission entry visible even though macOS does not authorize the new app. Another extracted copy can also launch instead of the one you approved.
- Quit every running Viska copy. Keep the version you want in Applications; remove obsolete extracted copies and avoid launching a build or backup from Spotlight.
- Open System Settings → Privacy & Security → Input Monitoring. Select the old Viska entry and click −. Click +, choose
/Applications/Viska.app, and turn it on. - Repeat the remove-and-add steps under Privacy & Security → Accessibility. Removing a permission entry does not uninstall the app or delete its models.
- Reopen Viska from Applications and use System-wide dictation → Re-check. Confirm both the hotkey and Accessibility paste are ready, then repeat the external-field test.
If an old Dock shortcut launches the wrong copy, replace that shortcut with the app from Applications. If macOS asks about Viska’s saved Keychain items, review and answer that prompt yourself; it is separate from the hotkey and paste permissions.
Still not working?
Double-Command does nothing.
Check that Viska is running from Applications and its hotkey backend is active. Use two separate left-Command taps or try Command+Shift+D. If another app or macOS dictation responds instead, review that app’s voice shortcut for a conflict. Re-add Input Monitoring after an update if necessary.
Recording works, but text is not inserted.
Check the automatic-paste switch and the separate Accessibility permission. Test in a plain TextEdit document with the cursor in the text, leaving focus there until transcription completes. Green permission status means event posting is permitted; it does not guarantee that every target application accepts it.
The microphone does not record.
Check Privacy & Security → Microphone and your selected input under System Settings → Sound → Input. If a USB microphone was disconnected, reconnect it and restart Viska. Make sure a downloaded model is selected.
Where should I report a problem?
Send the Viska version, macOS version, target app, which of the two status indicators is red, and the exact error message to Viska support. Do not include API keys or private dictated text.
Apple’s permission guides: Microphone, Input Monitoring, and Accessibility.
Back to downloads